

You can easily embed a Google Form directly onto your website using Poper, without needing to bug your developers every time.
Google Forms are fantastic for collecting information, and putting them right where your visitors are makes it even easier for them to respond.
Here’s how I recommend getting it done:
How to Embed Google Form in Website using Poper
Step 1: Get Your Google Form Embed Code
First things first, head over to the Google Form you want to embed. Click the "Send" button (usually top right).
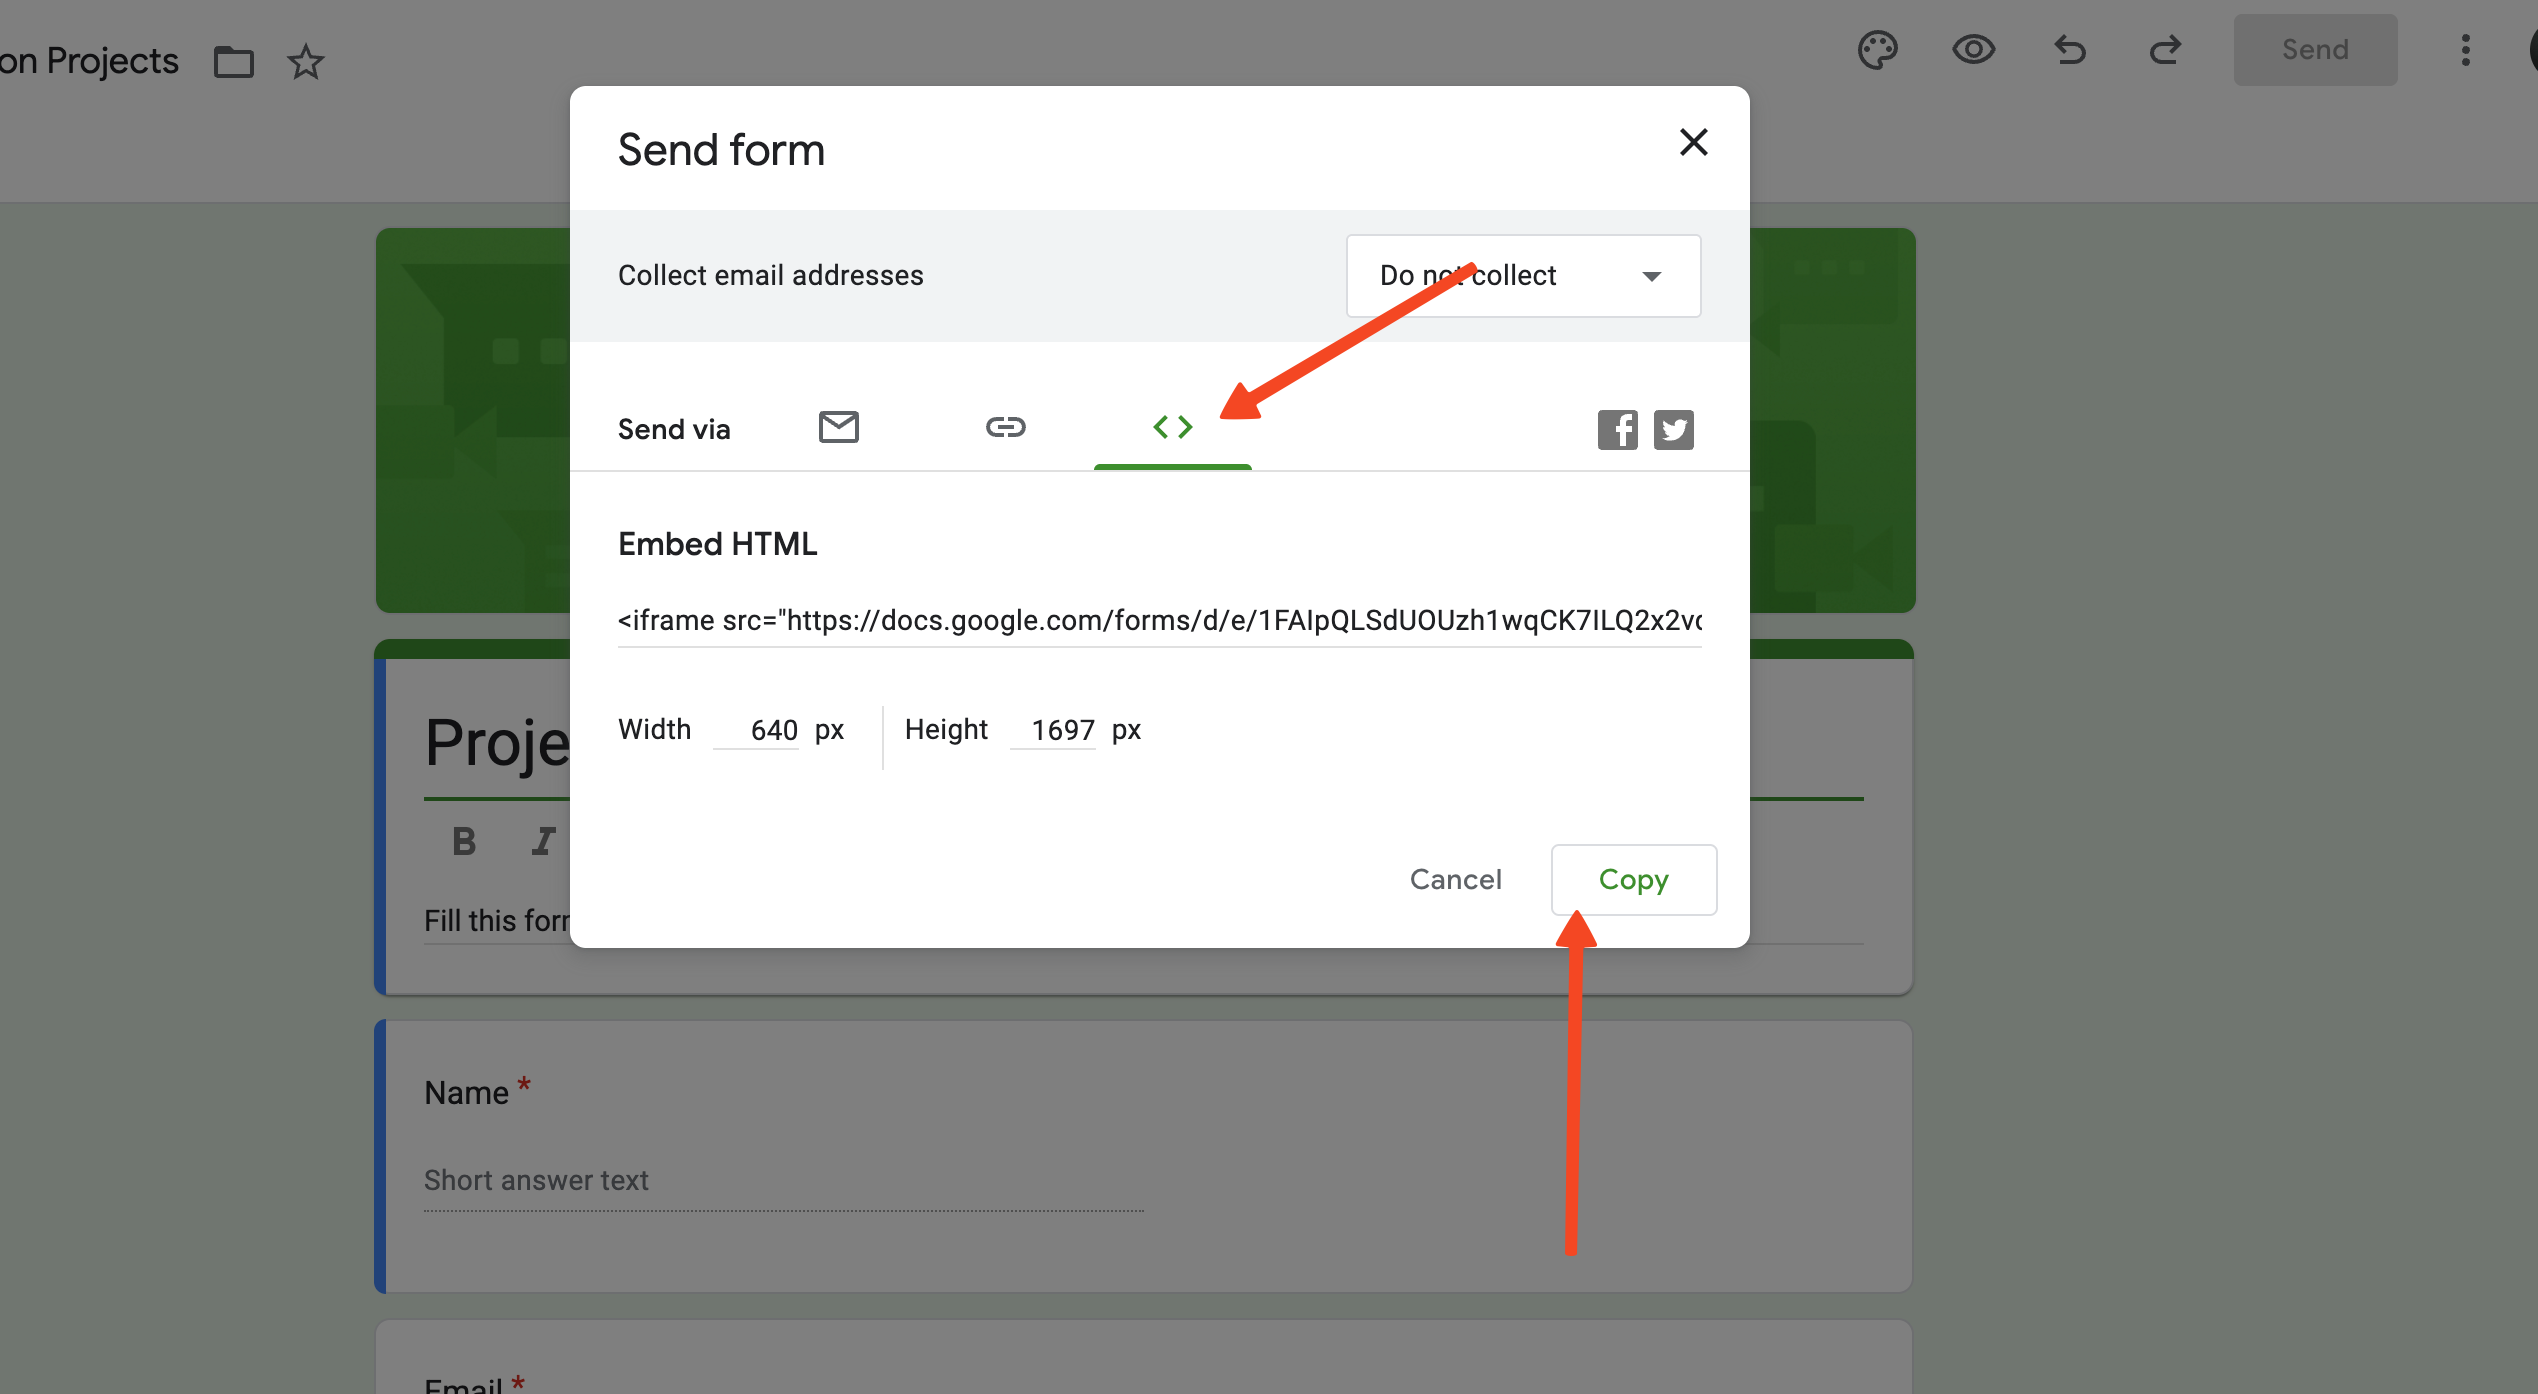
In the pop-up window, look for the "<>" (Embed HTML) tab. Copy the HTML code provided there – you'll need this in a moment.
Step 2: Set Up Your Poper Account and Domain
If you haven't already, sign up for a Poper account. Once you're in, you'll need to add your website's domain.
This tells Poper where your embeds and popups will eventually live. You can find this in the workspace settings.
Step 3: Create a New Embed Campaign
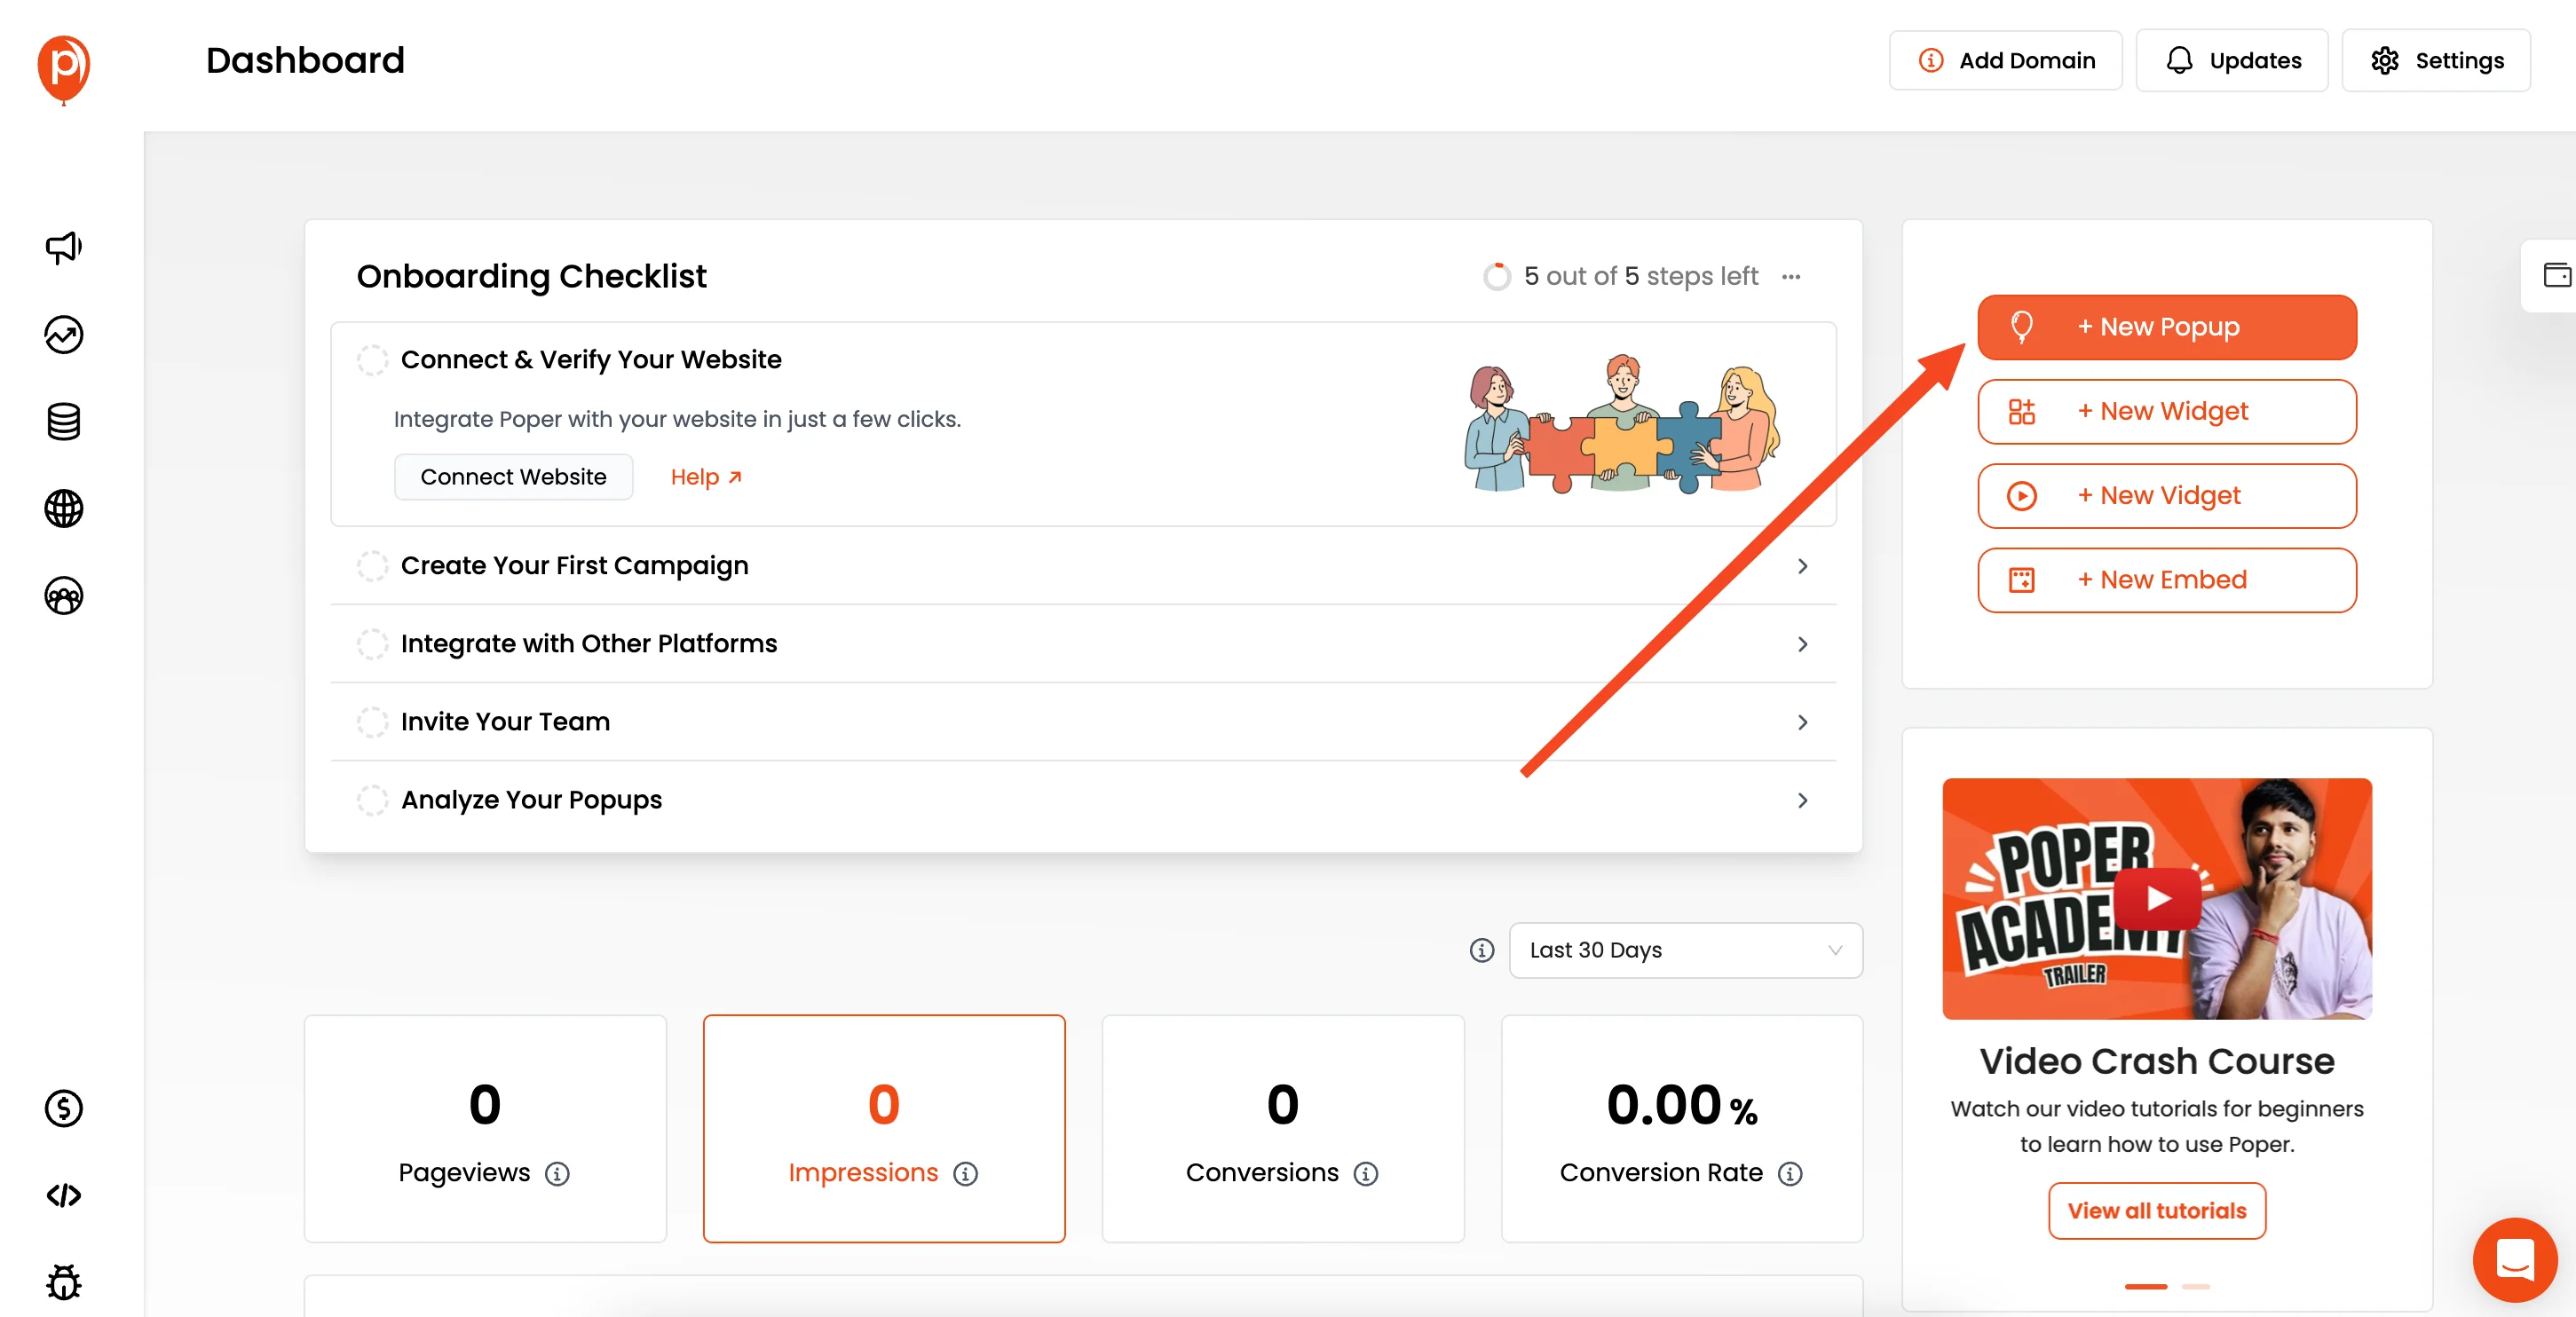
Inside your Poper workspace, find the button to create a new campaign. Since we're embedding a form directly into the page content, we'll start with an popup/embed type.
Note: Don't worry, you can change from Popup to Embed later. We chose popup as it has "Start from Scratch" option.
I suggest clicking "Start from Scratch" to have full control, though you could adapt a template if you prefer.
Step 4: Add the HTML Element
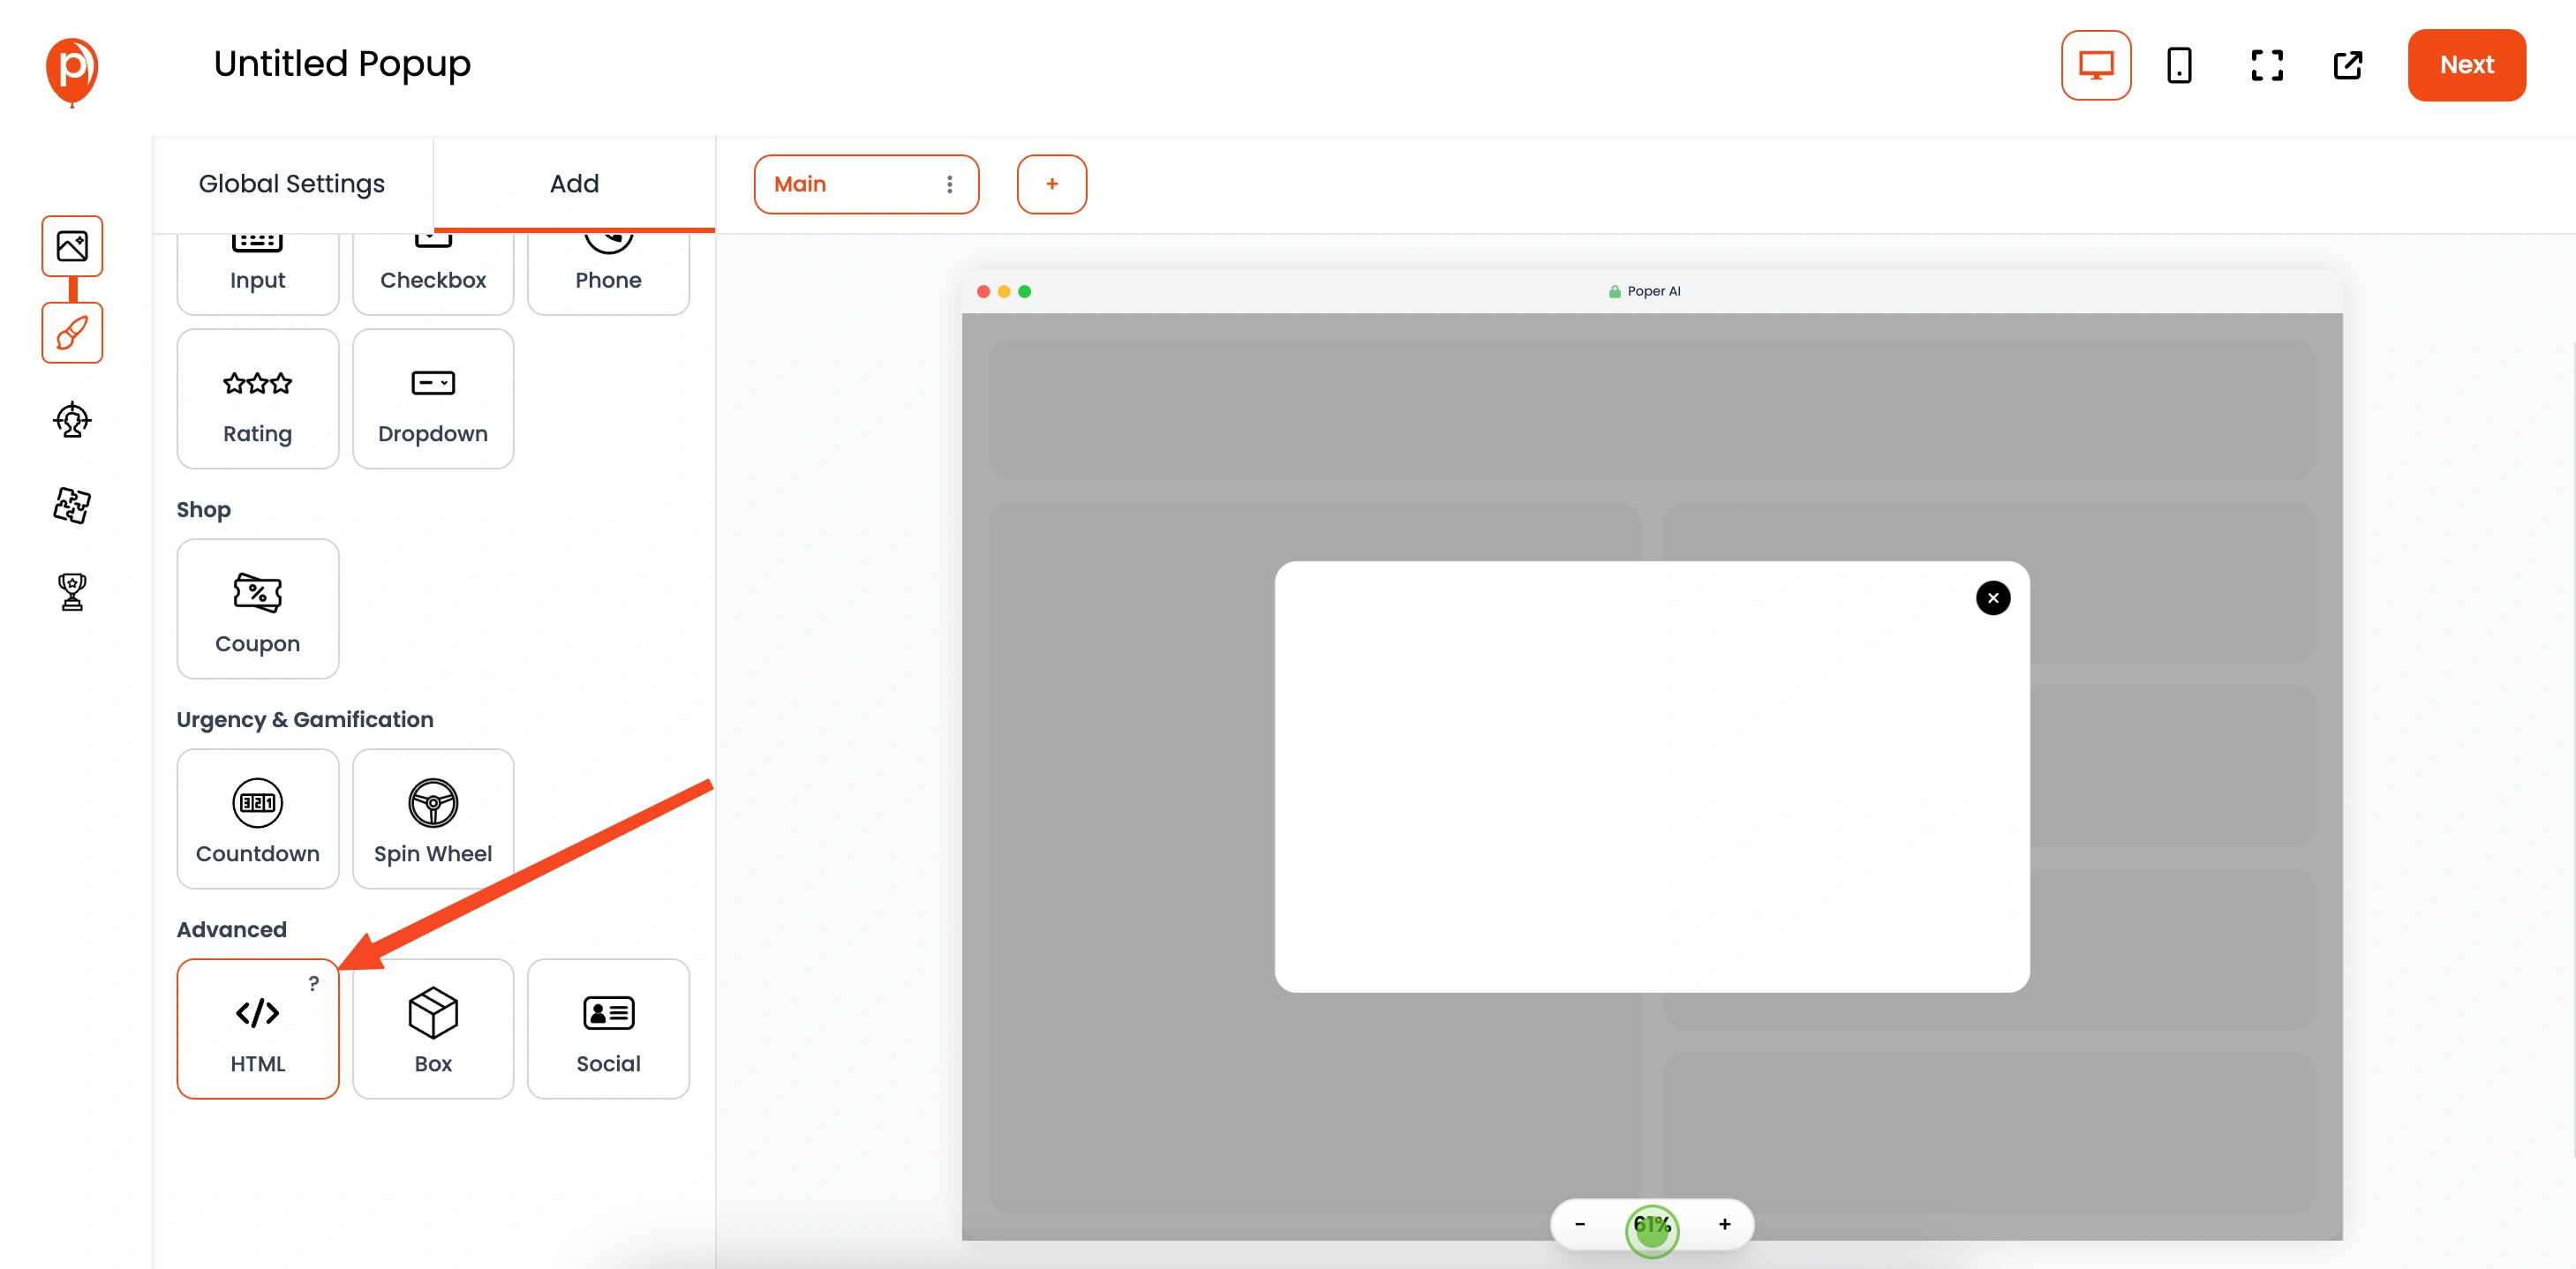
In the Poper editor, look for the sidebar, usually on the left. Click the "Add" tab. This shows you all the cool elements you can drop into your design. Find and click the "HTML" element.
Step 5: Paste Your Google Form Code
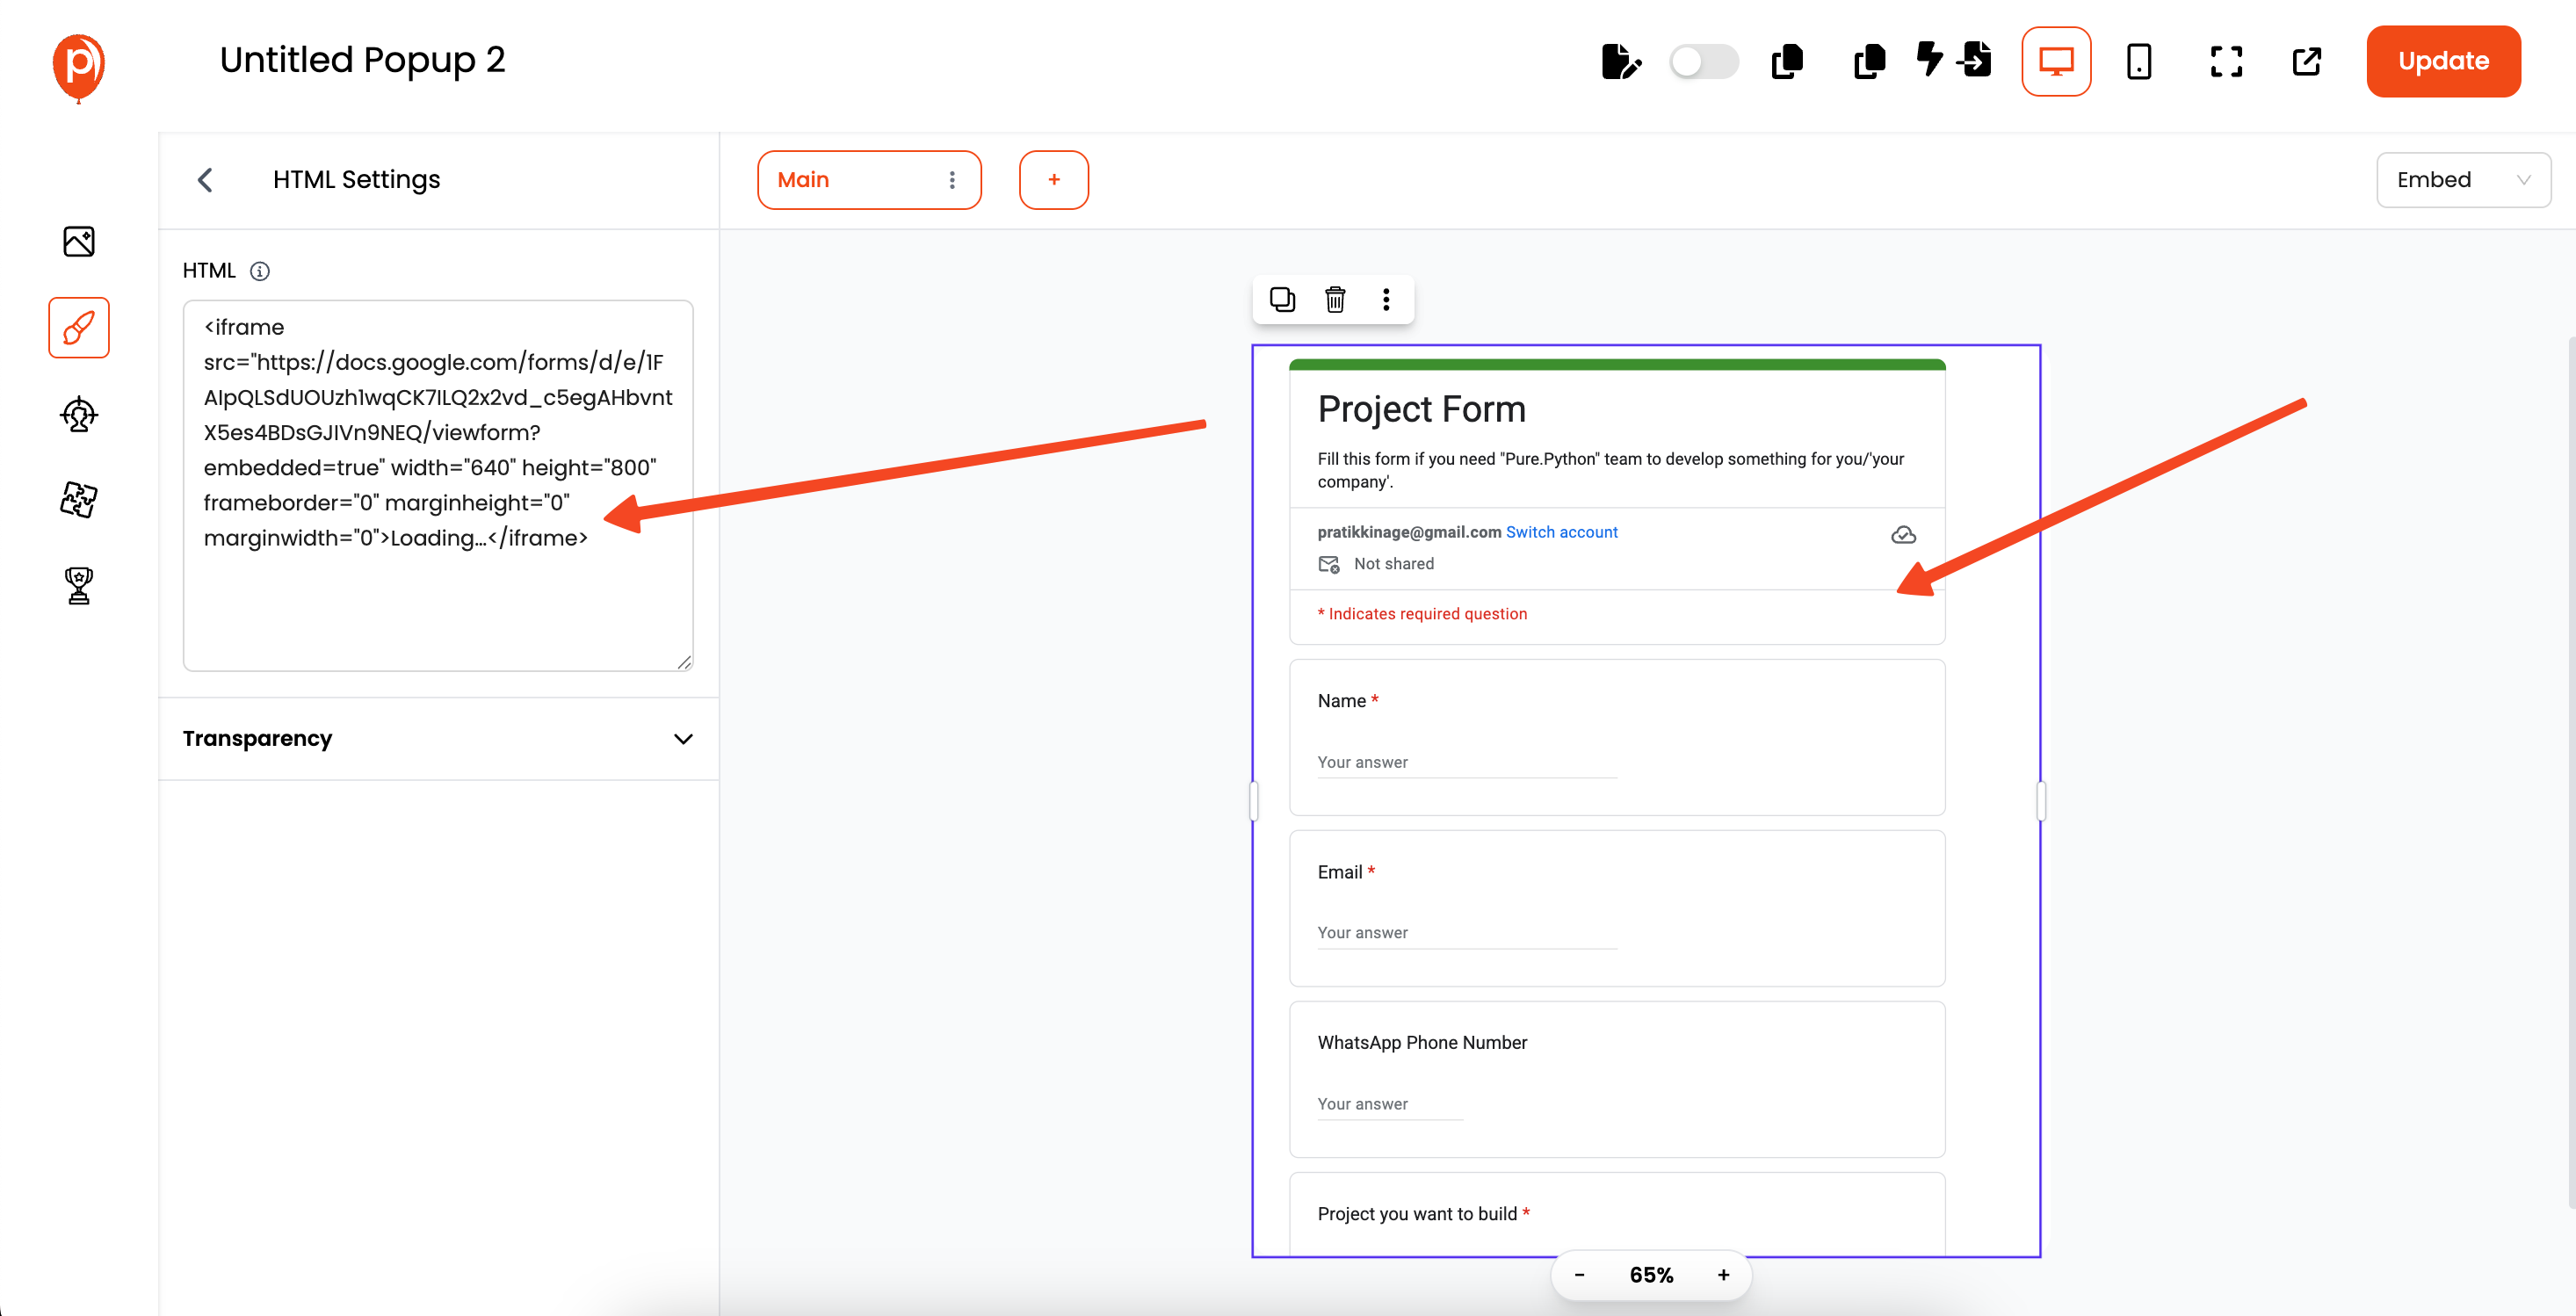
With the HTML element selected, you'll see a field in the sidebar where you can paste code.
Go ahead and paste the Google Form embed code you copied back in Step 1. You should see your form appear instantly in the editor preview!
Step 6: Position and Style Your Form
Now, simply drag the HTML element containing your form to position it exactly where you want it within the embed container.
If you want rounded corners on the form (sometimes the default embed has sharp edges), go to "Global Settings" > "Dimensions" and set "Overflow" to "hidden". This often helps smooth things out visually.
Step 7: Convert to an Embed (If Needed)
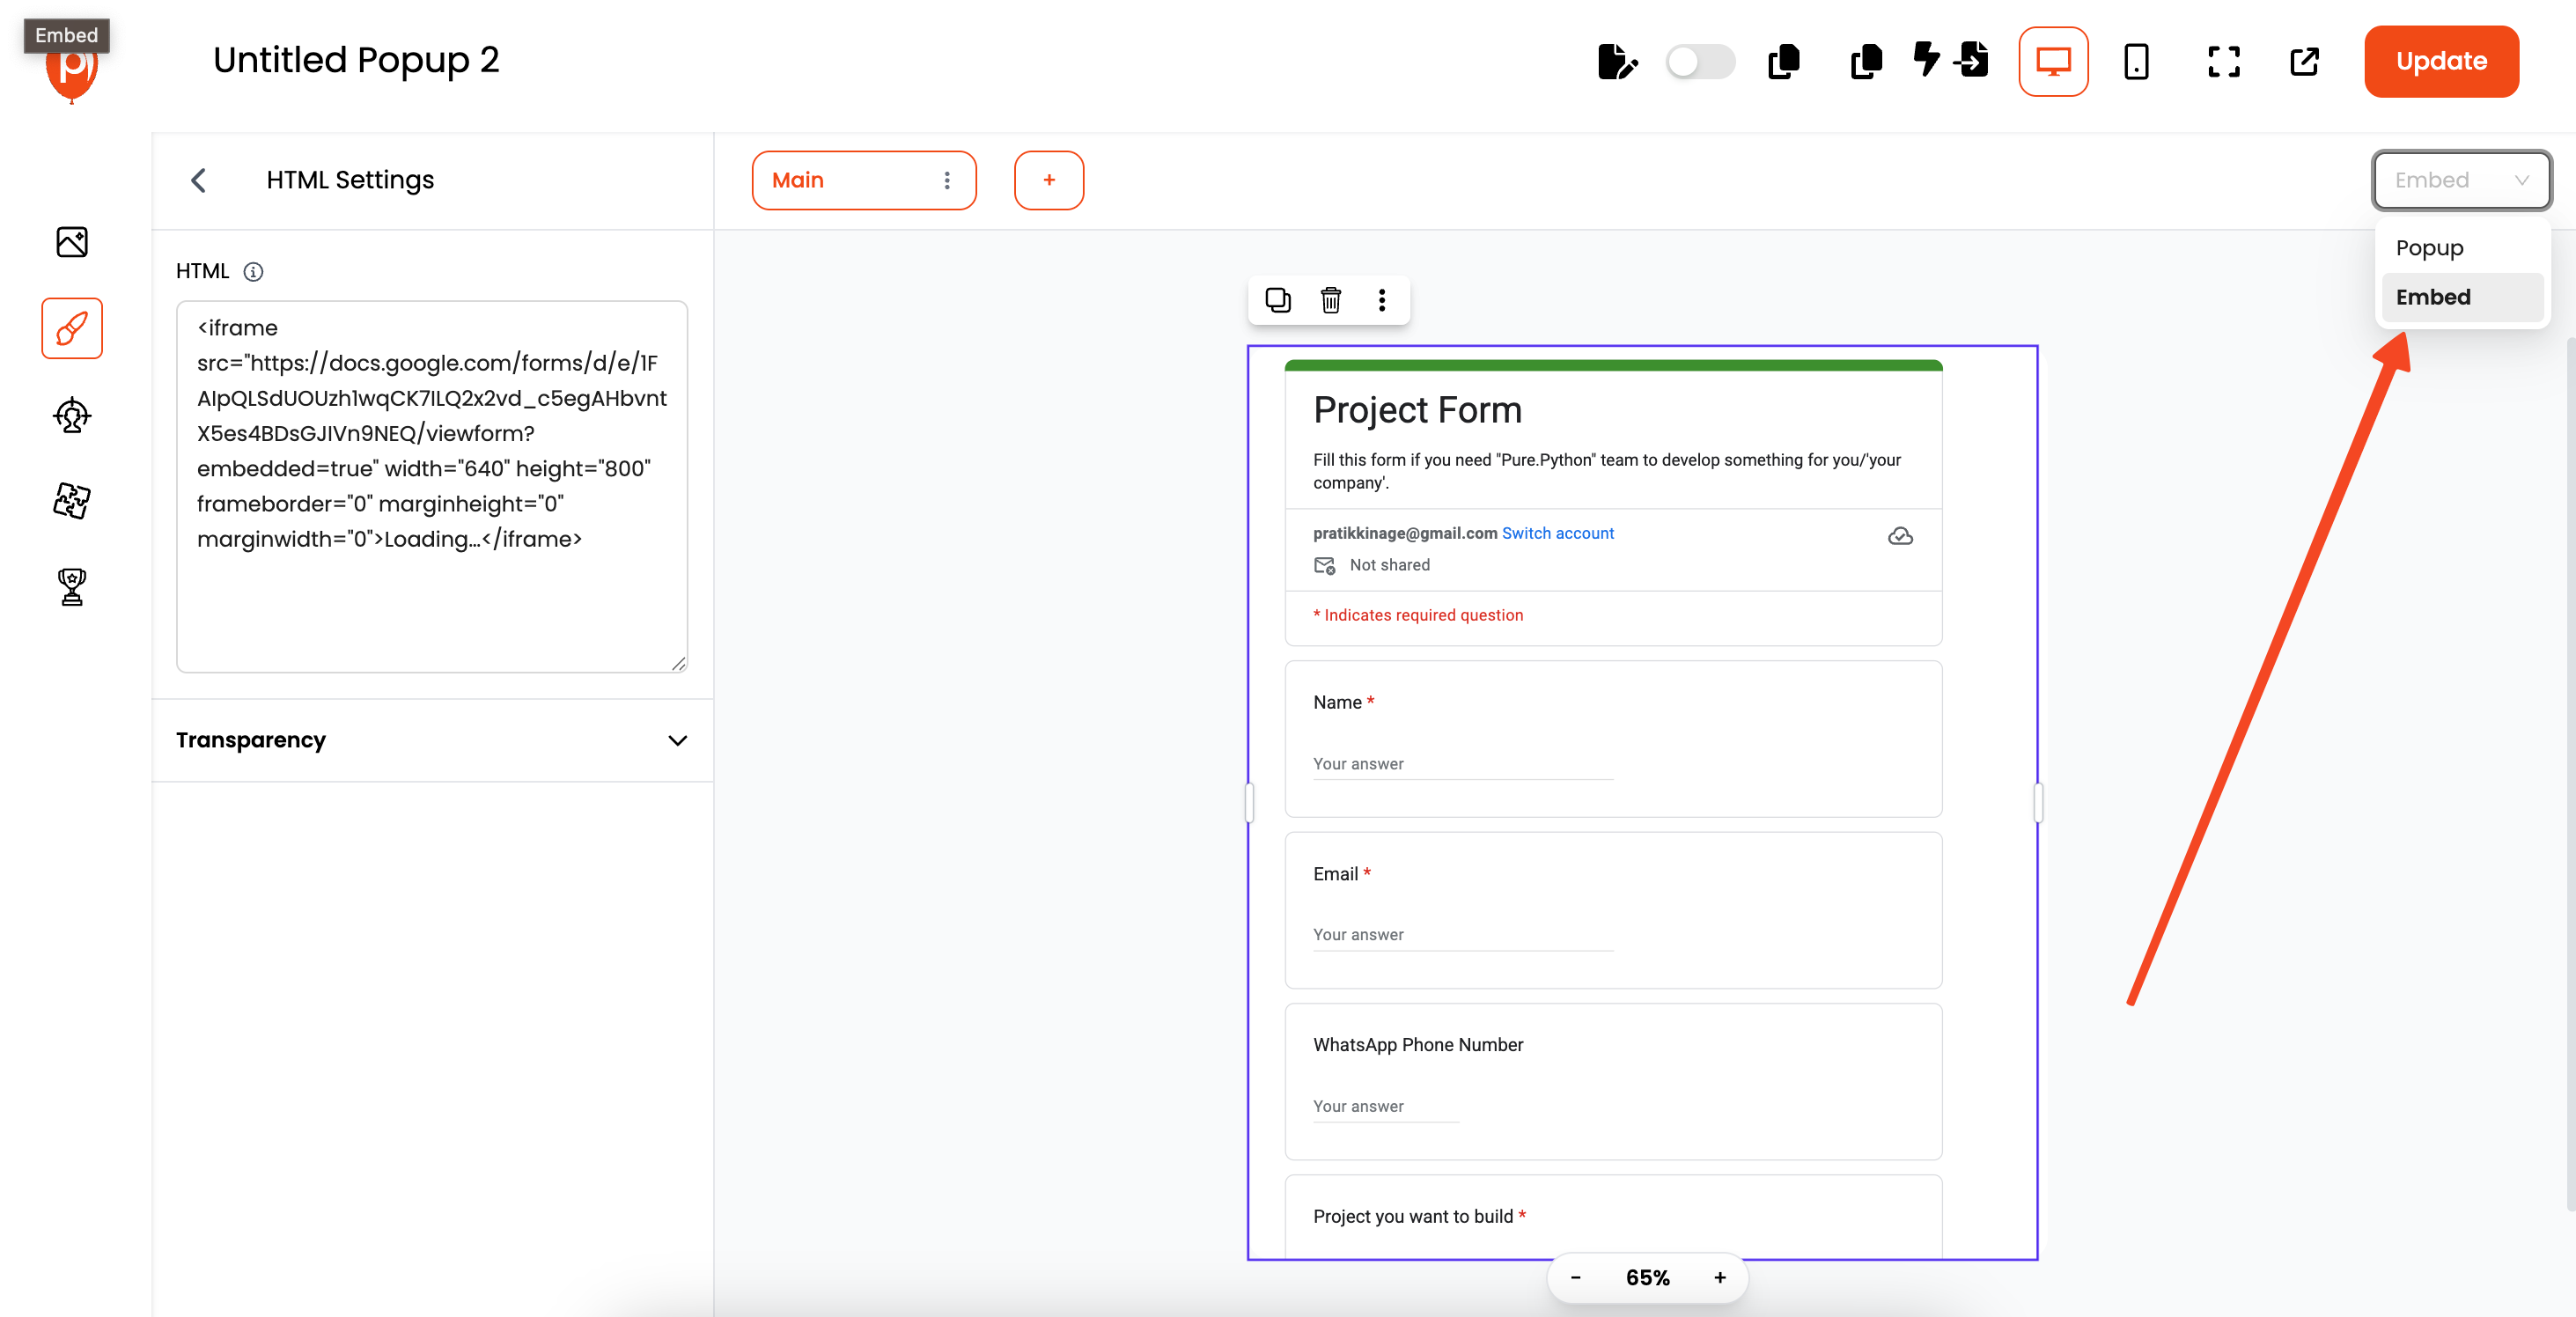
If you started with a popup template by mistake, look for a dropdown menu (often near the top right of the editor) and change the campaign type from "Popup" to "Embed". This ensures it integrates smoothly into your page flow rather than overlaying it.
Step 8: Set Display Conditions
Click "Next" or navigate to the "Display Conditions" or "Embed Position" section. Since this is an embed, you'll likely want it to show at specific location. You can usually set this using CSS selector.
Step 9: Publish Your Poper Embed

Once you're happy with the setup and conditions, hit "Save & Publish". This makes your embed live within Poper, ready to be added to your site.
Step 10: Add Poper Code to Your Website
Now for the final piece. Navigate to the "Code" or "Installation" section in your Poper workspace (usually in the main left navigation).
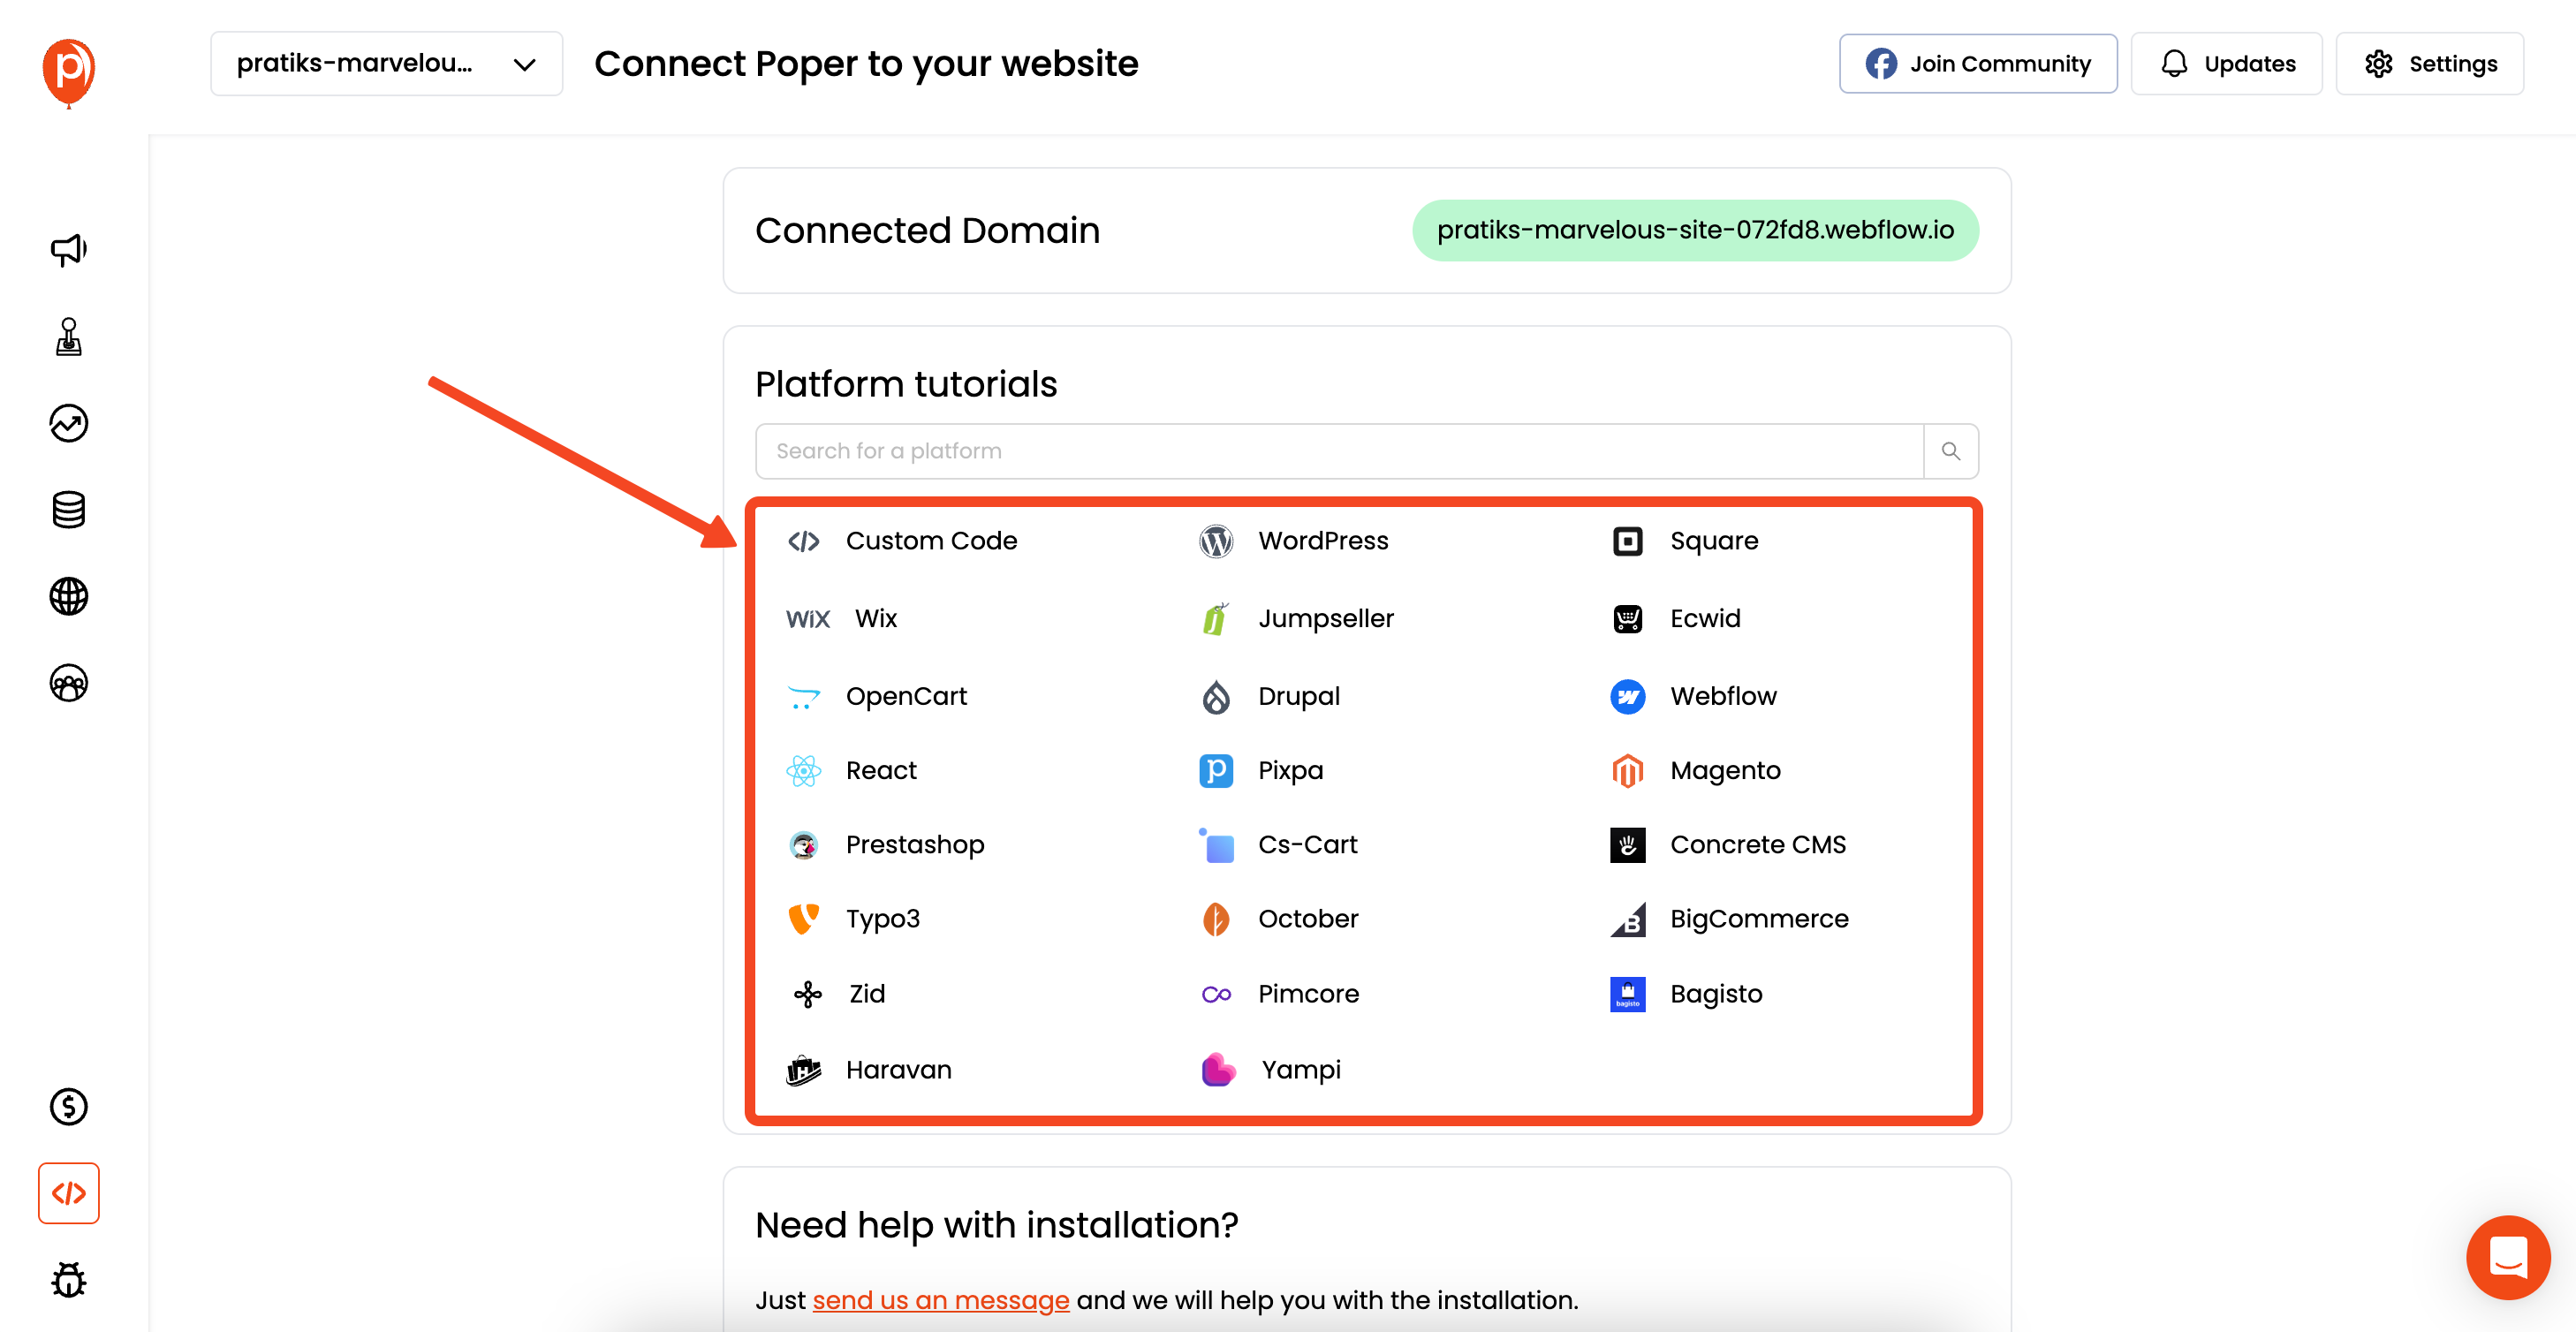
Select your website platform (like HTML, WordPress, Shopify, etc.) and follow the simple instructions to add the Poper script to your site. You only need to do this once!
Step 11: Test It Live
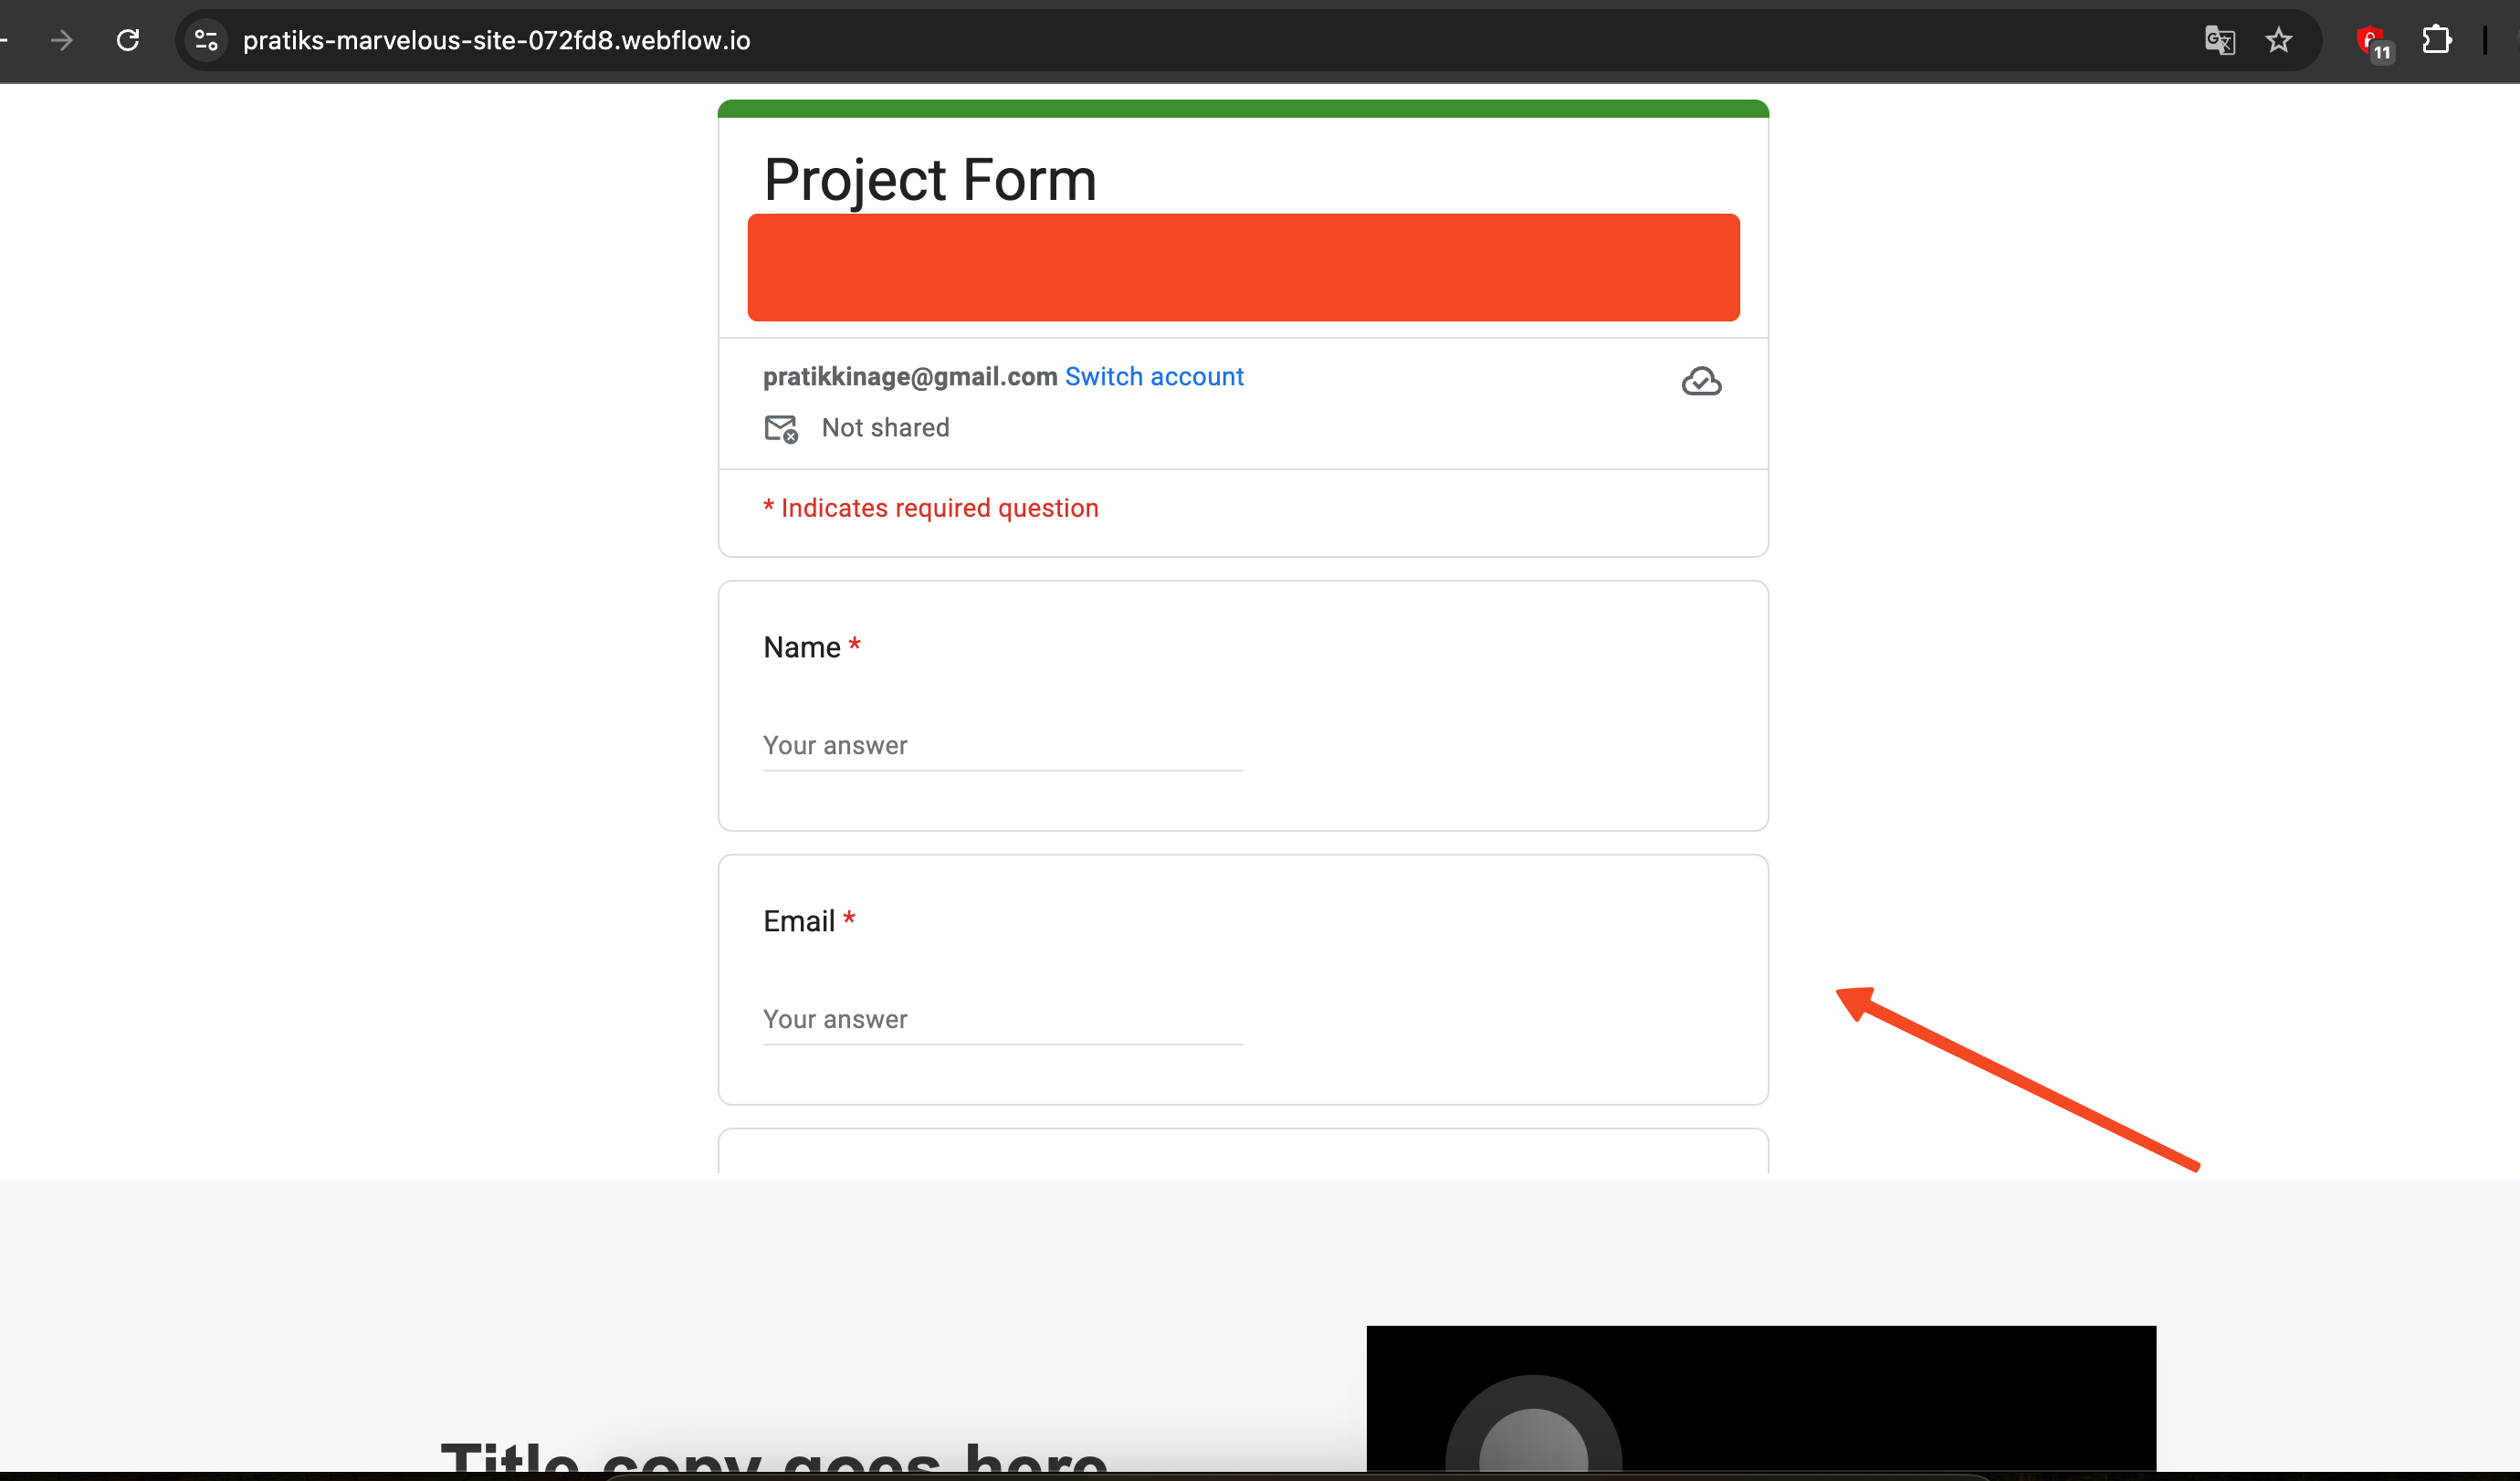
After adding the Poper script to your site, clear your cache and load the page where the embed should appear. Your Google Form should now be seamlessly integrated into your website content.
And that's it! You've successfully embedded a Google Form using Poper, keeping full control over its placement and appearance without writing any complex code yourself.
Method 2: The Standard Google Form Embed (The Basic Way)
This is the most direct method provided by Google.
Step 1: Get Your Google Form Embed Code
Open the Google Form you want to embed.
Click the "Send" button (usually top right).
In the "Send form" pop-up window, click the "<>" (Embed HTML) tab.
- [Optional: Insert Screenshot of Google Form Send -> Embed Tab]
[Optional: Insert Screenshot of Google Form Send -> Embed Tab]
You can adjust the width and height here if needed, but you can also control this later with CSS or Poper.
Click "COPY" to copy the HTML embed code to your clipboard.
Step 2: Add the HTML Code to Your Website
Navigate to the backend editor of the specific page on your website where you want the form to appear.
Find the option to add HTML, Custom HTML, or switch to the Text/Code editor view. (This varies depending on your website platform - WordPress, Shopify, Wix, Squarespace, custom HTML, etc.).
Paste the Google Form embed code you copied directly into the HTML block or editor.
Save or publish your page changes.
Advantages of the Standard Method:
Free and directly from Google.
Simple copy-paste for basic embedding.
Limitations of the Standard Method:
Limited Customization: Styling the form to perfectly match your site can be difficult.
No Advanced Targeting: You can't show the form based on user behavior (like exit-intent) or specific visitor segments.
Static Placement: It appears where you paste the code, always visible.
Requires Manual Updates: If you want to change where or how it appears, you often need to edit the page code again.
Beyond Basic Embedding: Unlock More Power with Poper
You've now seen how to embed a Google Form in your website using both the standard method and the more flexible Poper approach. While the basic embed works, using Poper offers significant advantages:
Easy No-Code Styling: Match the form's container perfectly to your site's design using Poper's visual editor.
Precise Placement: Use CSS selectors for exact positioning without touching page templates.
Dynamic Display (Beyond Embedding): While this guide focuses on embedding, remember Poper excels at popups, slide-ins, and widgets. You could put your Google Form inside a Poper popup triggered by:
- Exit-Intent: Catch visitors leaving your site.
- Time Delay: Show the form after a visitor has been on the page for a while.
- Scroll Depth: Trigger the form after they've scrolled through a certain percentage of the page.
- Button Click: Open the form when a user clicks a specific button.
Exit-Intent: Catch visitors leaving your site.
Time Delay: Show the form after a visitor has been on the page for a while.
Scroll Depth: Trigger the form after they've scrolled through a certain percentage of the page.
Button Click: Open the form when a user clicks a specific button.
A/B Testing: Test different placements or accompanying text/designs to see what gets more form submissions.
Centralized Management: Manage all your embeds, popups, and widgets from one Poper dashboard instead of editing individual pages.
Analytics: Track impressions and interactions with your Poper campaigns (though form submission data itself remains in Google Forms).
Best Practices for Embedding Google Forms
Keep Forms Concise: Only ask for the information you truly need.
Clear Call to Action: Explain why users should fill out the form.
Placement Matters: Embed the form where it's contextually relevant and easy to find.
Test on Mobile: Ensure the form looks and works well on all screen sizes (Google Forms are generally responsive, but test your page layout).
Thank You Message: Configure a helpful confirmation message within Google Forms settings after submission.
Conclusion: Take Control of Your Website Forms
Embedding a Google Form directly into your website is a great way to gather valuable information. While the standard HTML embed is functional, using Poper gives you far greater control, flexibility, and integration power without needing technical expertise.
Frequently Asked Questions (FAQs) about Embedding Google Forms
Is it free to embed a Google Form on my website?
Yes, getting the standard embed code from Google Forms and adding it directly to your website's HTML is completely free. Using a tool like Poper to embed offers significantly more control and features, and may have costs depending on the plan (though free tiers are often available for basic usage).
Can I easily change the look (style) of the embedded Google Form?
Directly styling the inside of a standard Google Form embed is difficult. However, using Poper, you can easily style the container holding the form (add borders, backgrounds, rounded corners, control spacing) using its visual editor to match your site's design, all without needing to write code.
Can I embed a Google Form in WordPress, Shopify, Wix, or other platforms?
Yes. The standard Google Form HTML code can be pasted into Custom HTML blocks available on virtually all platforms. With Poper, you install its script once on your site (works on WordPress, Shopify, Wix, Squarespace, custom sites, etc.), and then you can manage all your embeds (like this Google Form) from the Poper dashboard without touching your site's code again.
Can I track form submissions through Poper?
Poper tracks impressions (views) of the embed/popup containing the form. However, the actual form submission data (the answers) is collected and stored within your Google Forms account. You'll need to check Google Forms for the results.

